

DIY Root Touch Up At Home
Hair roots creeping through? Whether you’re covering greys or blending dark regrowth, learning a few clever root cover up hacks can make all the difference. The good news: you don’t need a salon visit every few weeks. With the right tools and techniques, a flawless root touch up at home is totally achievable.
Root touch up: key takeaways
- Root cover ups refresh your colour between salon visits.
- Different hair shades require different cover-up techniques.
- Work in sections, protect your skin, and blend carefully for the best results.
- Garnier Color Retouch offers quick and natural-looking solutions.
Root cover up for each colour
We’ve all been there – you dye your hair a lovely, vibrant shade, but after a few weeks to a month, you start seeing your natural colour peek through the roots. But fret not, for you don’t have to rush to the salon to get salon-worthy hair.
Below, we outline the best root touch up techniques for every colour, so you can feel fabulous from head to toe.
Blonde root touch up
Dark roots poking through blonde hair? Not on our watch. Whether you’ve got brown roots on blonde hair, black, ginger or grey, we have the at-home solution to keep your tresses a perfect shade of blonde.
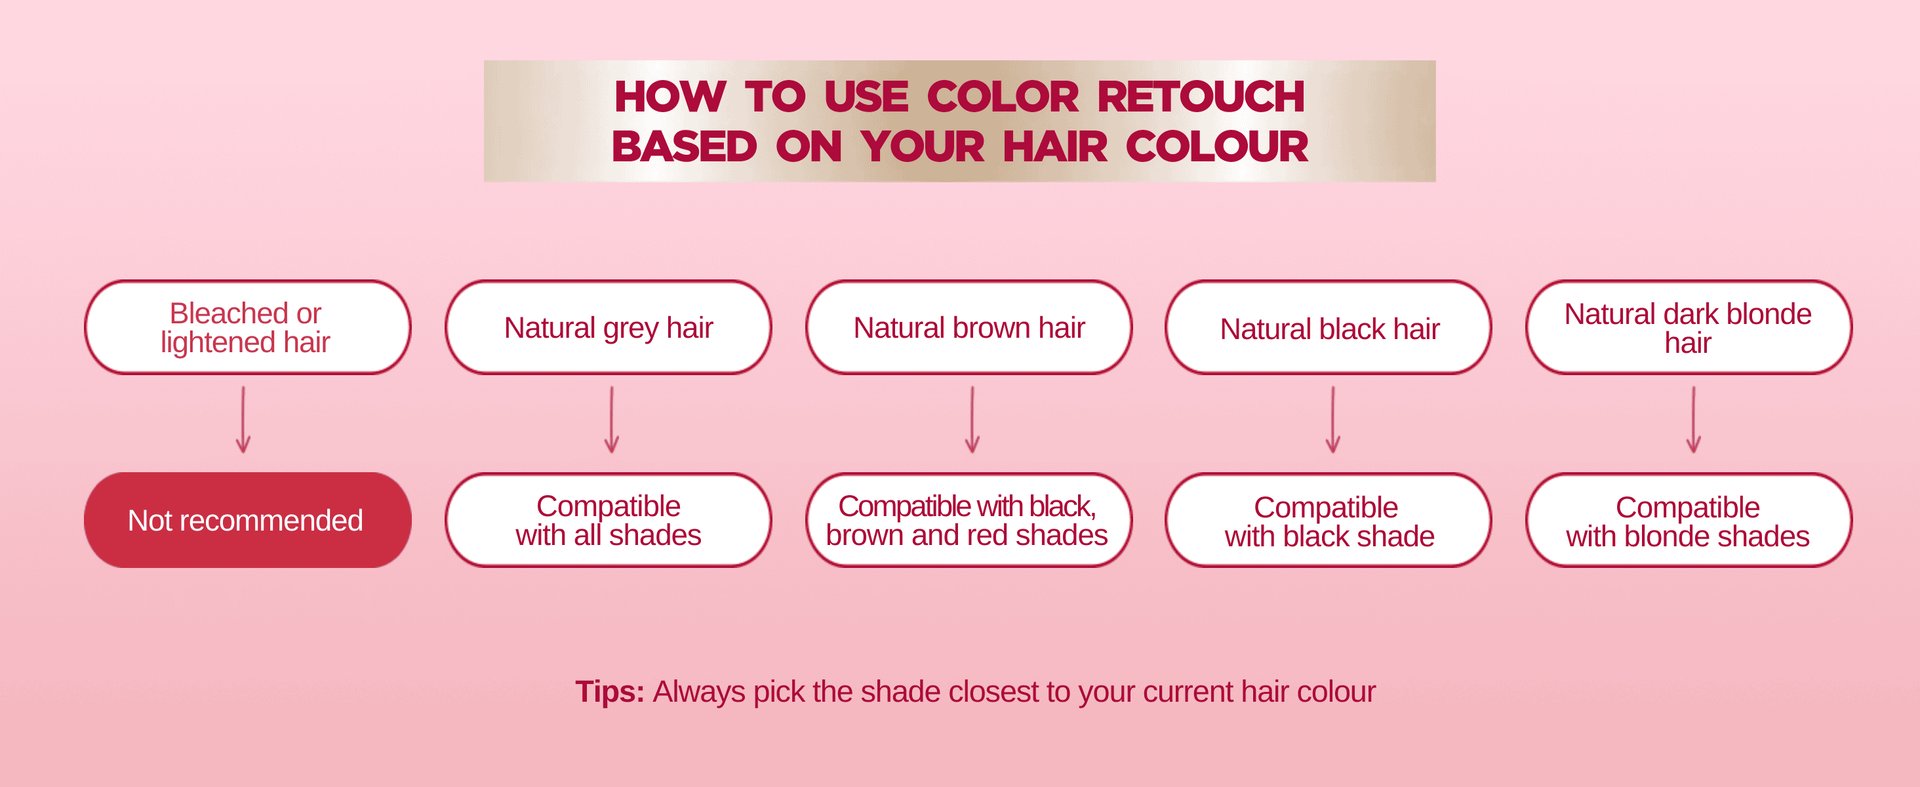
First, choose a blonde root touch up that matches the colour of your lengths. Our Garnier Colour Retouch range comes in 2 blonde shades that blend seamlessly with your hair colour:
Do you have light blonde or platinum bleached hair? We recommend using our Nutrisse Ultra Crème range instead, which comes in sixteen different blonde shades. For more inspiration on how to do blonde root touch ups, consult our tutorial.
Pro tip: Apply sparingly at the root line, then blend with a wide-tooth comb for a natural transition.
Brown root touch up
So you’ve dyed your hair a rich shade of brown, but now those pesky roots are poking through. Whether your roots are grey, blonde, ginger or black, there’s an easy way to get your roots to match your brown tresses. Pick from our 3 shades of root touch up dye:
Pro tip: Try a root smudge technique by applying a dark brown colour at the roots to blur the line into a lighter, sun-kissed brown for a beautiful ombre effect.
Black root touch up
To keep your dyed black or deep brunette hair looking lush, you want to ensure your roots are kept at bay, especially if your natural hair colour is light. Our Garnier Colour Retouch range comes in 2 shades of black:
Pro tip: Apply in thin layers at the parting and hairline for the most natural, seamless blend.
Red root touch up
Keeping your red tresses looking vibrant and full of life means keeping an eye on your regrowth. The Garnier Colour Retouch range includes 6.6 Red – the perfect shade to refresh your colour in between salon visits.
If you’re looking for more red and copper shades, check out our Olia Range for bold and bright shades:
- 7.40 Intense Copper
- 6.66 Vivid Garnet Red
- 6.60 Intense Red
- 4.62 Dark Garnet Red
Pro tip: To keep your red shade looking fresher for longer, use a sulphate-free shampoo and rinse with cool water – it helps lock in the vibrancy of your touch up
How to dye roots at home like a pro
Even if it’s your first time, a salon-worthy result is within reach with the right root touch up technique. Here’s how to dye your roots at home for a flawless result:
Always perform an allergy test
Perform the allergy test at least 48 hours before dying your hair, even if you have already used colouring products before.
Protect your skin
First things first, you want to ensure you don’t end up with dye on your skin. To prevent this, apply petroleum jelly or a barrier cream along your hairline and ears.
Work in sections
Divide your hair into four quadrants using a hair clip or hair ties to keep each section neat. Apply dye to the roots one section at a time, working methodically from back to front to ensure even coverage.
Use the right tools
Swap those uncomfortable kitchen gloves for professional colouring gloves. All our Garnier dyes come with gloves included. Some dyes can be applied directly to the hair with your hands, others may need a tint brush and applicator for precision. Always read the leaflet for advice on the best application method.
Blend evenly
Apply to the roots and then gently comb the colour downwards to avoid harsh lines, this ensures you get a uniform colour from roots to lengths. For a softer, lived-in finish, apply a slightly darker shade at the roots and feather it into lighter lengths.
Grey root touch up
Grey roots can poke through quite quickly. Consult our handy guide on how to cover grey roots and hair for the best application techniques and results.
Timing matters
Follow the instructions closely. Leaving dye on too long or rinsing too early can affect colour payoff. If you’re using our Garnier Colour Retouch you’ll get perfectly covered roots in just 10 minutes.
Now that you know how to dye your roots at home, take a look at our full range of hair dyes to find the best shade for you.